

Best Practices For Security In Next.Js

I am a software engineer passionate about building fast, scalable apps with beautiful user interfaces.
Next.js is a popular React framework that can be used to build high-performance and secure web applications. However, even Next.js applications are not immune to attack. This article will discuss some of the best practices for securing your Next.js applications, covering a range of strategies from foundational coding techniques to advanced security considerations.
As a web developer, you are responsible for creating functional and secure applications. This can be challenging, as security is often seen as an afterthought. However, it is important to remember that security is essential for any application that handles sensitive data.
Attackers increasingly target web applications to steal data, disrupt operations, or launch other malicious attacks. According to Sitelock, 18% of websites have critical security risks, such as backdoors and malicious file modifications. Additionally, 4.1 million websites have malware at any given time.
Common security vulnerabilities in web applications
The web is constantly evolving, and with that change comes new security vulnerabilities. However, new methods are continually being developed to protect against these vulnerabilities. The OWASP Top 10 is a list of the most common web application security risks and how they affect users:
Injection flaws like SQL injection and cross-site scripting (XSS) allow attackers to inject malicious code into a web application. This can be used to steal data, modify data, or take control of the application.
Broken access control allows attackers to access resources they should not be able to access. This can be used to steal data, modify data, or take control of the application.
Sensitive data, such as passwords, credit card numbers, and social security numbers, can be exposed if improperly protected. This can be done in various ways, such as storing data in clear text or not using strong encryption.
Cross-site scripting (XSS) flaws allow attackers to inject malicious code into a web application. This code can then be executed by the victim's browser, which can be used to take control of the browser to steal or modify data.
Unvalidated redirects and forwards can trick users into visiting malicious websites. This can be used to steal data, install malware, or take control of the user's computer.
Insufficient logging and monitoring make detecting and responding to security incidents difficult. This can allow attackers to remain undetected and continue to attack the application.
Now that you know what can go wrong, how can you guard against it? It is impossible to predict all possible vulnerabilities, but you can significantly improve the security of your app by addressing the most common risks. The following are some best practices for improving the security of your Next.js app.
Keep dependencies up-to-date
Outdated dependencies are a security risk, as they may contain known vulnerabilities that attackers can exploit. When you update your dependencies, you get the latest versions, which often include crucial security fixes for vulnerabilities discovered in previous versions.
Here are a few tools that you can use to keep your dependencies up-to-date:
NPM audit
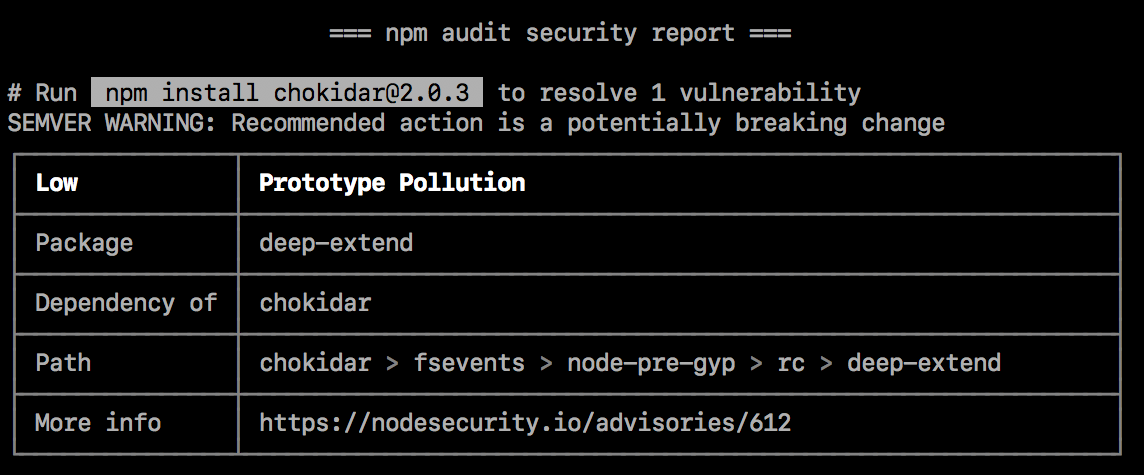
Node Package Manager (npm) comes with audit—a built-in command-line tool that assists in identifying security vulnerabilities within your project's dependencies.
It does this by scanning your project’s package-lock.json or yarn.lock to gather information about the installed packages and their dependencies. It then compares the package information against the Node Security Platform (NSP) database, which contains a comprehensive list of known security vulnerabilities in various packages and versions.
To use npm audit in Next.js, navigate to your project’s root directory in your terminal and run the code below:
npm audit
Once the scan is complete, it will generate a report detailing the vulnerabilities found in your project. The report categorizes vulnerabilities by severity levels (low, moderate, high, critical) and suggests remediating them.
Dependabot
This GitHub service automatically creates pull requests to update your dependencies when new versions are released. It is available for all repositories on GitHub, regardless of the size or popularity of the repository. It is also available for all programming languages that use package managers, such as Node.js, Python, and Ruby.
To use Dependabot, you need to enable it in your repository settings. Once enabled, it will start scanning your dependencies for new versions and create a pull request to update when a new version is released. You can then review and merge the pull request if you are happy with the changes or reject the pull request.
Use proper input validation
Input validation is the process of checking user input to make sure that it is valid and does not contain any malicious code. It protects your app from cross-site scripting (XSS), SQL injection, and file upload attacks. It is essential to help you get clean, usable data that is secure and accurate while improving user experience.
There are two ways to validate inputs in Next.js: using built-in methods or external libraries.
Built-in methods
HTML offers various ways to check if forms are filled out correctly, with the most popular one being the required attribute. It guarantees that a field must have some content. In your Next.js application, you can apply this by adding the attribute to your input tags. Additionally, HTML includes a pattern attribute, allowing you to perform more advanced validation using regular expressions when necessary.
Here’s an example:
import React, { useState } from 'react';

function MyForm() {
  const [formData, setFormData] = useState({ firstName: '', email: '' });

  const handleChange = (e) => {
    const { name, value } = e.target;
    setFormData({
      ...formData,
      [name]: value,
    });
  };

  const handleSubmit = (e) => {
    e.preventDefault();
    // Perform form submission or validation logic here
    console.log(`Form submitted with data:`, formData);
  };

  return (
    <form onSubmit={handleSubmit}>
      <label>
        First Name:
        <input
          type="text"
          name="firstName"
          value={formData.firstName}
          onChange={handleChange}
          required // Indicates that this field must have content
        />
      </label>
      <br />
      <label>
        Email:
        <input
          type="email"
          name="email"
          value={formData.email}
          onChange={handleChange}
          required // Indicates that this field must have content
          pattern="[a-zA-Z0-9._%+-]+@[a-zA-Z0-9.-]+\.[a-zA-Z]{2,}"
          // Uses a regular expression to validate email format
        />
      </label>
      <br />
      <button type="submit">Submit</button>
    </form>
  );
}

export default MyForm;
In the code above:
You created a form component that takes in a
firstNameandemailinput and displays it in your browser's console when thesubmitbutton is clicked.Each input has a
requiredattribute, making sure that a user fills it before they can submit.The
emailinput also has apatternattribute, which contains a regex pattern that checks that the user inputs a valid email address.
External libraries
In addition to the built-in methods, there are also many libraries that you can use to write efficient, simple, and complex forms with validation. Some popular libraries include React Hook Form, Formik, and React Final Form.
React Hook Form helps enforce proper input validation by providing a number of features, such as:
Diverse validation options: It provides a
registermethod for your HTML<input>element with built-in validation parameters such asrequired,pattern,minLength, andmaxLength. You can even create custom validation functions using itsvalidaterule. React Hook Form’sControllercomponent also provides more granular control over the input state, allowing easier integration with external libraries and more complex validation logic.Error messages: Its
useForm()hook provides aformState: { errors }property, allowing you to create custom error messages and UI for each input.Async validation: React Hook Form supports async validation, which allows you to validate user input against a remote API. This can be useful for validating sensitive data, such as credit card numbers.
Performance: It leverages React Hooks for better form state management, dynamic form fields, and cleaner code while adding zero extra dependencies to your Next.js project.
Follow this guide to set up React Hook Form in your Next.js project.
Set up authentication and authorization
Authentication and authorization are two essential security concepts for any web application.
Authentication verifies a user's identity by requiring users to provide a username and password or using a more secure method such as two-factor authentication. Authorization controls what a user can access by assigning different roles, such as admin, editor, or user.
To implement secure authentication in Next.js, it is best to use a robust authentication library like NextAuth.js, Passport.js, or Clerk.
NextAuth.js is very popular and offers the following features:
NextAuth.js follows security best practices by default. It handles session management, CSRF protection, and secure cookie handling, reducing the risk of common security vulnerabilities in your authentication system.
Built-in support for various authentication providers, including social logins (Google, Facebook, Twitter, etc.), email/password, and more. You can easily configure and use multiple authentication providers within your application, allowing users to choose how they log in.
NextAuth.js can work seamlessly in serverless environments, such as Vercel or AWS Lambda, without requiring any modifications to your code. This enables you to build scalable, serverless applications with robust authentication.
It allows you to define custom callback functions for various authentication events, such as when a user logs in, logs out, or encounters an error during authentication. This flexibility allows you to execute custom logic or integrate with external services at specific points in the authentication flow.
Simplified session management by providing a straightforward API for managing user sessions and authentication state. It abstracts away the complexities of handling cookies and JWT tokens, making it easy to determine whether a user is authenticated and access user data within your application.
Follow this guide to learn how to set up NextAuth.js in your Next.js application.
Encrypt sensitive data
Encryption is the process of converting data into a form that unauthorized users cannot read. It is a powerful tool that can be used to protect sensitive data, such as passwords, credit card numbers, and other identifiable personal information.
There are many ways to encrypt data in your Next.js application. Some of them include:
HTTPS (TLS/SSL Encryption): Implementing HTTPS ensures that data transmission between the client and server is encrypted, protecting it from eavesdropping and interception.
Client-Side Encryption: Use JavaScript libraries like CryptoJS or the Web Crypto API to perform encryption on the client side before transmitting data to the server, ensuring data remains encrypted during transit.
Data Masking and Redaction: In cases where you need to display sensitive data, consider implementing data masking or redaction techniques to show only a limited portion of the data, such as the last four digits of a credit card number, rather than displaying the entire sensitive value.
JSON Web Tokens (JWT): Securely transmit data between the client and server using JWTs that can be signed and optionally encrypted to ensure data integrity and confidentiality.
Data Encryption at Rest:
localStoragepresents security risks due to plaintext data storage, creating vulnerabilities. To mitigate unauthorized decryption and provide secure user authentication, consider using a library like React Secure Storage to enhance security by dynamically generating unique encryption keys, effectively addressinglocalStorage's security limitations
Implement security headers
Security headers are directives that can be added to HTTP responses to provide an additional layer of protection. They control how browsers handle various aspects of your application's interactions with the user. They can protect against various attacks, such as cross-site scripting (XSS), clickjacking, and man-in-the-middle attacks.
There are several security headers that can be implemented in a Next.js app. Some of the most important ones include:
Strict-Transport-Security (HSTS)
Strict-Transport-Security: max-age=3571000; includeSubDomains; preload
HSTS instructs browsers to communicate with your Next.js application exclusively over HTTPS, ensuring data encryption and protection against man-in-the-middle attacks.
X-Frame-Options
X-Frame-Options: DENY
# or
X-Frame-Options: SAMEORIGIN
This header tells browsers not to display the page's content in an iframe. This helps to prevent clickjacking threats.
Content-Security-Policy (CSP)
Content-Security-Policy: default-src 'self' 'https://blog.openreplay.com'; image-src 'https://unsplash.com'; script-src 'self' https://www.google-analytics.com; font-src 'self' 'https://fonts.googleapis.com';
CSP controls which sources can load scripts, styles, and assets on your web pages, mitigating XSS and data injection attacks.
Referrer-Policy
Referrer-Policy: origin-when-cross-origin
Referrer-Policy controls information sharing about the referring URL, protecting user privacy.
Setting up security headers in your Next.js app
Next.js has specialized packages such as next-secure-headers and next-safe to manage security headers. You can also use custom solutions such as Helmet.
Use TypeScript for type safety
All bugs are a result of human errors during app development. While such errors tend to reduce as your experience improves, sometimes you can miss a bug until it gets to production and becomes a significant security issue.
TypeScript is a typed superset of JavaScript that can help to improve the security of a Next.js application by catching errors at compile time. It improves code readability, reduces runtime errors, and improves code maintainability. This can help to prevent a variety of security vulnerabilities, such as:
Null pointer dereferences: These errors occur when a variable is dereferenced but contains the value null. Typescript can help prevent these errors by requiring all variables to be initialized before use.
Type mismatches: These errors occur when a value of one type is assigned to a variable of another type. Typescript can help to prevent these errors by checking the types of variables and expressions at compile time.
Out-of-bounds array accesses: These errors occur when an array is accessed with an index outside the array's bounds. Typescript can help to prevent these errors by checking the index of array accesses at compile time.
Write maintainable tests
Tests help to find bugs, prevent regressions, improve code quality, and document your code. For example, You can set up automated tests to check for cross-site scripting (XSS), SQL injection, and file upload vulnerabilities.
The environment in which your code runs can change over time, introducing new security vulnerabilities. Tests can help to check for unexpected results in your code’s changing environment. You can also check for edge cases—unexpected situations that can be security vulnerabilities if mishandled.
There are a few different ways to set up testing in Next.js. One popular option is to use React-Testing-Library with Jest. For end-to-end tests, consider using Cypress.
You can also consider using CodiumAI’s extension in your IDE. It leverages artificial intelligence to generate test cases in your preferred library. You can then review the test cases and choose the ones for your project.
Tips for writing maintainable tests:
Keep your test cases focused and straightforward, using descriptive names and avoiding unnecessary complexity.
Clearly define expected outcomes and employ appropriate assertion methods to validate them, avoiding custom or unclear assertions.
Isolate your tests from external dependencies by creating mocks or stubs that simulate their behavior, ensuring they remain independent and predictable.
Organize tests logically, use testing frameworks for execution, keep test code in the same repository, and document complex cases for easy maintenance.
Continuously update and refactor your tests to match evolving code, adding test cases for bug fixes to prevent regressions.
Conclusion
In this article, we explored common security vulnerabilities in web applications, such as injection flaws, broken access control, sensitive data exposure, and cross-site scripting. We also provided a comprehensive overview of security best practices for Next.js applications, recognizing that security is an ongoing process and an integral part of web development. By following these practices, you can build more secure and resilient applications, safeguarding sensitive data and protecting against various threats.


